
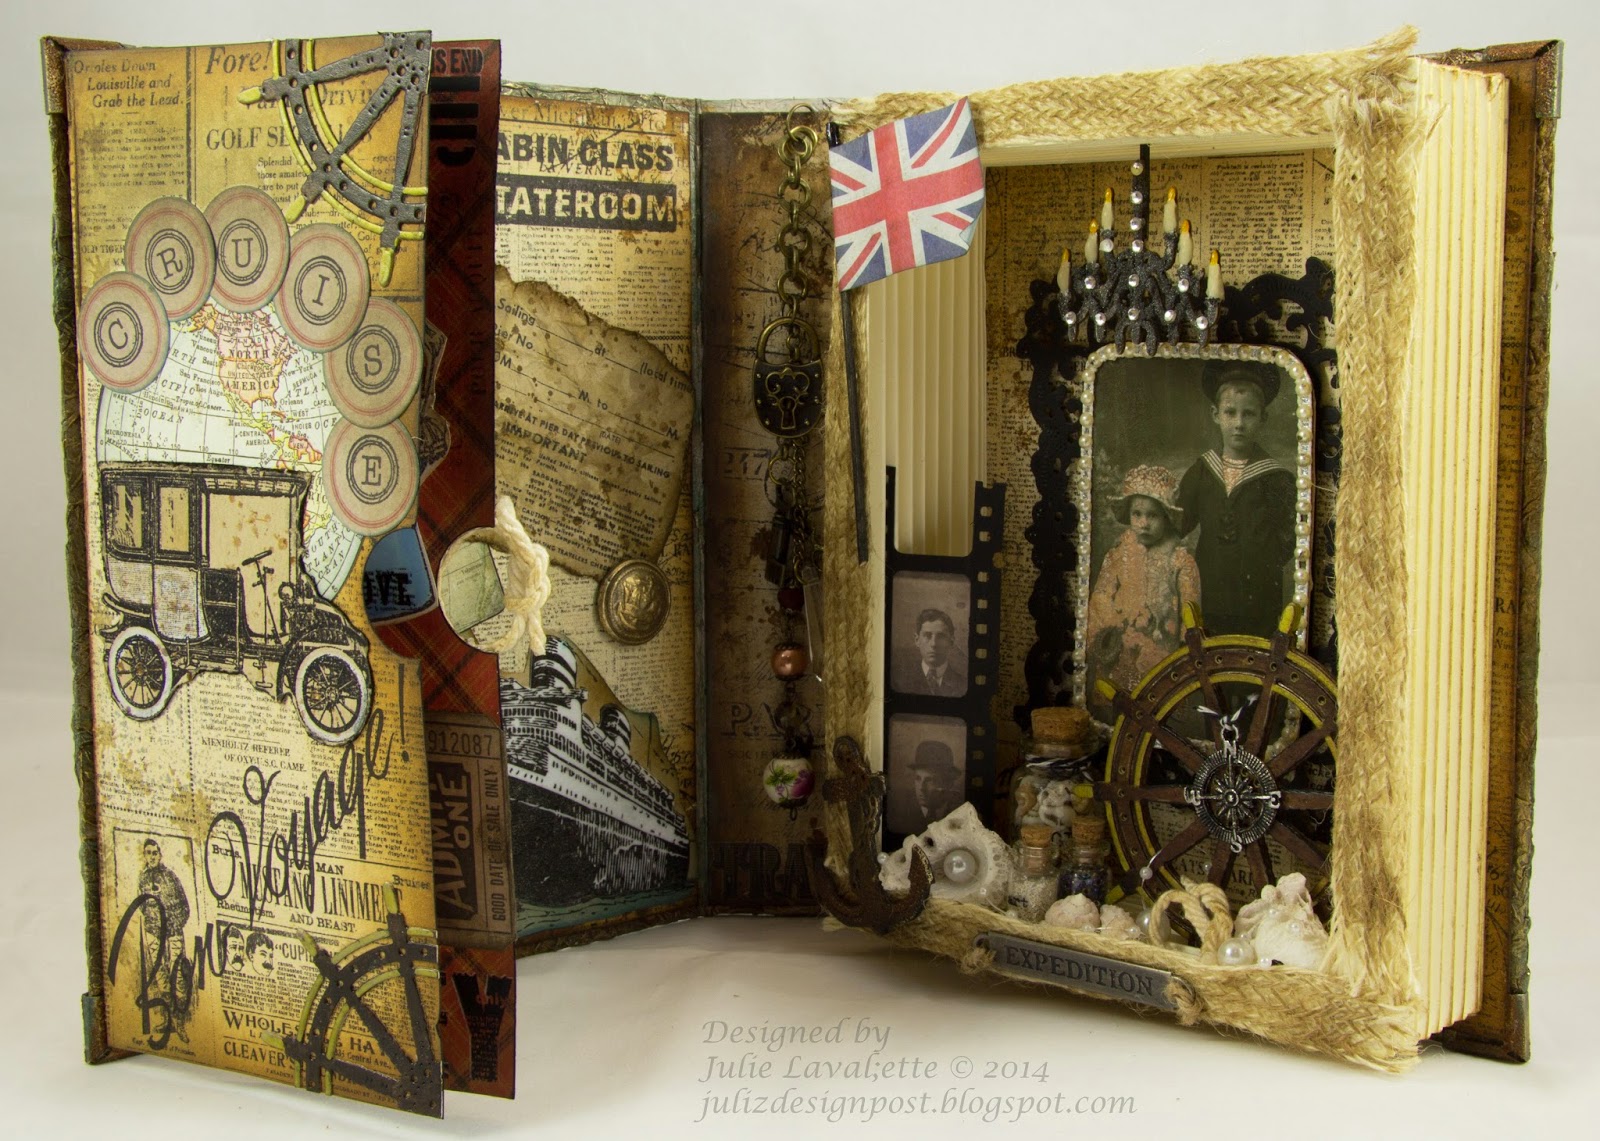
For my Nautical project I decided to make a memory frame
book that
held memories and keepsakes of a Victorian couple as
they embarked on
their World Cruise and as they travelled the world
picking up souvenirs. You may want to grab yourself a cuppa before you start
reading my post as it goes into many details.


My book was made out of a couple of cereal boxes. I
cut my card to
size, scored and glued down the spine. The finished
outside measures 7x9 Closed by 2 inches in the spine.

Next I added a whole layer of
tissue paper with multi medium crinkling it as I applied it. Once dry I placed
a swirl stencil on top and added Grunge Paste for more texture and interest.

The spine I covered another piece of cereal box in
tissue paper and added some string for dimension and then glued onto book.


Once this was all dry I applied a coat of gesso and a mix of Deco Art and Paperartsy paints with a brush and baby wipes, gradually building layers. I also spritz on
some distress stains drying my layers in between as I built them up too. The
stains pooled in the textured areas, giving depth. I finally highlighted with a
little gilding wax, I now had my Olde Worlde look. My metal embellishments on
the front and the corners were all given an aged rusty look, by adding some
paint and distress powders, finally highlighting with a little gilding wax on
them too.
 |
| Click to Enlarge |

Now let's go inside. You will notice I carried my tissue
paper and painting around the edges of the inside of my book. The pages glued
onto the cover of my book, were yes, you guessed it cereal box again. This time
I wrapped my patterned paper around the cardboard. I then distressed the edges
and added some more random stamping to the pages and some of Tim's remnant
rubs. I built up the arrangements onto these pages until totally happy with my
layouts before finally gluing in.

My Eiffel Tower and anchor, I used distress powder on to give an aged rust look.

My ticket was stamped using Archival ink onto kraft
card, I also stamped on little damp marks. I then tore around the edges,
crumpled the paper and swiped through distress stain and distress the edges
with ink. I made a mould from an old navy button my dad had. I then poured
platinum utee into it and rubbed with gilding wax.

My ship I stamped firstly onto kraft paper and another on
white card. This one I pressed into Versamark and embossed with powders twice
heating from underneath to give a lovely glossy feel to the ship, of it being well polished . I then fussy cut it out
and placed onto the kraft paper.

My Victorian couple - a free stamp, were coloured by
Copics and fussy cut , I arranged a collage for interest. My little ships knots
placed on the pages and in the frame my dad kindly made for me. After years in
the Merchant Navy he has never forgotten this art.


The reason behind my jewellery embellishments hanging on the inside spine were to
highlight a possible safe in their cabin to keep treasured keepsakes and the
jewels worn. You will see a padlock, key, glasses and jewels on the chain.


Now for my picture frame. I decided on the size of frame
I wanted and scored at half inch intervals, folding back and forward to mimic
book pages, I glued into a box shape and added distress to age my pages. My
Cheery Lynn anchor and ships wheel were both cut out of cereal packet and
several layers glued together. My anchor was painted, distress powder and
gilding wax added. My wheel was coloured with Copics.


My little bottles I placed Remnant Rubs onto, filled with
sand, shells, glass beads and tied a little twine around them. My image from Tim's lost
relatives pack, I coated with distress rock candy paint and once dry I added
distress into the cracks. I decorated the edges with pearls and mounted onto my
die cut. You will see in the mix some shells more pearls and another ships knot
made by my dad.

My chandelier was to mimic some of the opulence in the
ship. It started off as a wooden shape. I added ferro paste and pressed some
bling onto it whilst still wet. My candles I used a distress pen on the wick
and added glossy accents. The actual candle had beeswax dripped onto it.

Well I do hope you managed to get to the end of my post
and have enjoyed reading my journey with this project. It was an absolute
pleasure to make and the icing on the cake is it being showcased on CountryviewChallenges - thanks.
If you need to know anything about a product please just
ask me. However, the majority of my products used will be found at CountryviewCrafts, fantastic service and 99% of the time next day delivery. Also CheeryLynn designs.
Would love if you have time to leave me a comment.
Happy
Crafting,
Julie x
I would like to enter this in to :
- Lessology Challenge 40# Travelogue ( Rice Krispies Box )
- Vintage Udfordring - At Least 3 Layers Challenge
- Try it on Tuesday - Recycle it Challenge ( Rice Krispies Box )
- Divas by Design - Anything but a card Challenge
- Sugar Creek Hollow - Word Play Challenge
- Rhedds Creative Spirit - September Challenge
- Simon Says Stamp - Monday Challenge # Rock the Technique
- Altered Electics - September Challenge Time - Anything Goes
- The Mirror Crack'd - Anything Goes Challenge
Wow what can I say,this is such a masterpiece....perfect in every way.xxx
ReplyDeleteOh wow Julie, what an amazing project!!! This book looks fantastic, from the stunning cover to each little corner of the inside! Love how you took the nautical theme and made it your own, this is brilliant!!
ReplyDeleteWhen I see a creation like this it makes me wonder if you realise what an exceptionally talented lady you are. It is a long time since I have seen such a stunning piece of work, it is magnificent! You never fail to impress, I love every little detail of this work of art.... Anne xx
ReplyDeleteThink Anne sums it up Julie! I want to add,I really mean this,this is one of the most stunning creations I have seen. Your attention to detail is breathtaking. I love everything about it,especially that chandelier.....you must be so proud of this,it's truly wonderful
ReplyDeleteBig hugs
Donna xxx
Hi Julie this is just stunning, you have so much talent...and this is a work of art. How lucky CVC are to have you as their GD today. The step by step is also fabulous, thanks for sharing your creativity here in blogland x
ReplyDeleteWell Julie, what can I say. This is the most beautiful and magnificent piece of work that I have seen in a long time. Truly wonderful , and the attention to detail is fantastic. Your talent is huge and I really don't think you realise it. Well Done . Have a Good Day. Hugs Rita xxx
ReplyDeleteJulie, this is exceptionally beautiful! I love the textured look of the front cover and the added elements are a perfect touch! Love, love!
ReplyDeleteIngrid xx
Wow!!!!this is impressive and brilliant recycling as well. Your attention to detail is amazing. Love all the stunning textures and layers of paints inks.
ReplyDeleteThank you for sharing this superb creation
Hugs Annie xx
I don't know where to start! This is just blowing my mind! Out of this world spectacular! Every detail was done with TLC, like using actual wax on the candles! Wowsers!! The textures, the colours, the images, those cutsie little bottle of shells and sand!! I just can't stop admiring it!! This is truly a work of art! WOW, hugs :)
ReplyDeleteWow !! what an absolutely gorgeous project ..there are so many beautiful details here... Definitely a crafty treat to watch :)
ReplyDeleteJulie having seen your gorgeous Nautical project I just wanted to let you know this project would be perfect for the Lessology challenge going on you can check out the details here :
ReplyDeletehttp://lessology.blogspot.in/2014/09/lessology-challenge-40-travelogue.html
And even if I didn't have time to comment, dear Julie, I would feel obliged to do so! Your piece is so stunning and detailed... I took ages to go through it, scroll down, scroll up again, maximize the images, reading your excellent tutorial. I am completely overwhelmed and thank you so much for sharing both inspiration and how-to!
ReplyDeleteGreetings from Manu
Fantastic nautical project, amazing detail and great tutorial.
ReplyDeleteThank you for entering it in the challenge at The Mirror Crack'd.
Happy crafting, Angela x
Gorgeous project with so many fabulous details! Love that texture you created on the outside! Fantastic! Thanks for playing along with us at Simon Says Stamp Monday Challenge!
ReplyDeleteI just noticed you entered at Divas by Design, what a treat!!
ReplyDeleteI am so excited you joined us for our Anything But A Card challenge!
Hugs Pamellia GDT :)
I'm back!!!!! Sorry Julie, I should have read your challenge list, but I wanted to make sure I said thank you for entering your stunning project at Try it on Tuesday!
ReplyDeleteI'm so glad you decided to play along with our Recycle It challenge, your Rice Krispies box makeover is the perfect entry!
Hugs Pamellia DT :)
Amazing! Love the textures and all the bits n bobs you have used inside. A work of art.
ReplyDeleteThanks for joining us at Rhedd's Creative Spirit.
Moira DT xx
Amazing project love every single detail! So glad you joined us at Sugar Creek Hollow!
ReplyDeleteOh my goodness, I am speechless, this is a GORGEOUS project. I love everything about it! Thanks so much for sharing and joining us at Divas by Design. Hugs, Mirella
ReplyDeleteSo gorgeous! I love the texture and color combo on that cover- pure yumminess!
ReplyDeleteThis is truly a masterpiece, and I can tell via your description and details how much you enjoyed making it. I am new to mixed media and I enjoyed and appreciated your generosity in sharing your process.
ReplyDeleteWhat a stunning work! Love the texture at the cover and all the nice elements inside of it.
ReplyDeleteThanks for joining us at Vintage Utfordring!
Mette - DT
When art tells a story and is rich in detail then I cannot help but be transfixed by it, that is what is happening as I read and view this post because the transformation of some humble packaging into this assemblage is nothing short of breath taking.
ReplyDeleteI have never attempted to create such a project but you have fired me up to at least try to create something with this form to it.
Also, before I leave I must also applaud you on the texture you achieved for the outer cover.
A memorable project to say the very least.
Wishes
Lynne
That's another breathtaking creation. I'm really blown away.
ReplyDeleteoh wow this is totally awesome love the insdie and the outside. Fab tutorial and thanks for sharing with us at Divas by design hope to see you again real soon.
ReplyDeleteWOW WOW WOW!!!! thanks for sharing with us at LESSology!
ReplyDeleteThis has got to be one of the best projects I've ever seen - I can't tell you how fantastic I think it is! Many thanks for joining the Rhedd's Creative Spirit challenge and good luck!!! Melissa (DT)
ReplyDeleteAmazagobs! LOOOOVE:):) You would NEVER have imagined it had come from cereal boxes. Totally incredible...loved all the closies, & your explanations along the way....thanks so much for joining in with us at LESSology this month:):)
ReplyDeleteOh how wonderful is this - so much texture and so much to see - love it
ReplyDeleteHilda x
I know I'm repeating what others have already said but I LOVE THIS and your imagination, OMG :)!
ReplyDeleteHi Julie, I don't remember how I found your blog but once I started looking at your projects I was instantly mesmerized and I just couldn't stop reading your posts. All your work is simply amazing, and this piece in particular is exceptional. I love your attention to detail not only in your creations themselves, but in how you write about them. I have always been partial to recycling in art and this piece is a masterpiece. I am now following you through both Google and Bloglovin and will come and visit again. Thank you for the incredible inspiration.
ReplyDelete:) Chris / CS Designs
This is just amazing. I love all the details and thankyou for showing us how you did it all.
ReplyDeleteI am now a follower.
Angela
Papercraft Nook
Wonderful project with great textures and design elements. Thank you for joining us at Try it on Tuesday. Mar x
ReplyDeleteThis is such a fabulous project, love all the details and images. Those recycled cereal box covers look so wonderful - lots of colour and textures.
ReplyDeleteThanks for sharing with us at TioT
Avril xx
This is totally gorgeous. Stunning vintage look. The embellishments and details are amazing. Thanks for sharing with us at Sugar Creek Hollow.
ReplyDeleteAmelia (DT Sugar Creek Hollow)
WOW holy smokes this is an awesome project, just stunning. I love all the textures, colours and the immense attention to detail, mind blowing!!!!
ReplyDeleteThank you for coming over and join in with us at Rhedd's Creative Spirit.
Great Big Huge Hugs
Becca xx (DT Member)
wonderful journey, thank you for sharing at TIOT.EE
ReplyDeleteFor a wonderful creation!
ReplyDeleteThank you for participating with us in the Vintage Challenge, and good luck!
Vibekke - DT
Stunning project... Love the colours & amazing attention to detail...WOW, WOW, WOW...Love it all... Thank you for joining us at Altered Eclectics... Hugs May x x
ReplyDeleteWhat a stunning project Julie, fabulous details. Love the colour and texture on the cover, wow! Ruth x
ReplyDeleteOMG you must get through a lot of cereal, OR you are a hoarder, I suspect the latter is true!
ReplyDeleteWhat an amazing project. Beautiful both inside and out. So much fabulous detail, and it started life as Shreddies or something similar.
Thank you so much for supporting our very first challenge and we hope to see you again next time.
Lin
The Mirror Crack'd
Brilliant piece of mixed media art, loved the texture ad colors!!
ReplyDeleteThank you for joining us at Mirror cracked challenge this month.
So gorgeous!!! Thanks for playing along with LESSOLOGY!!!
ReplyDeleteThis is a stunning and so detailed project. Just a beautiful creative piece of art. Thank you so much for sharing with us at the Mirror Crack'd.
ReplyDelete